This tutorial assumes you have experience working with React and, at some point, have faced the problem of prop drilling. Just in case, take a look at the following example to give you some context about prop drilling.
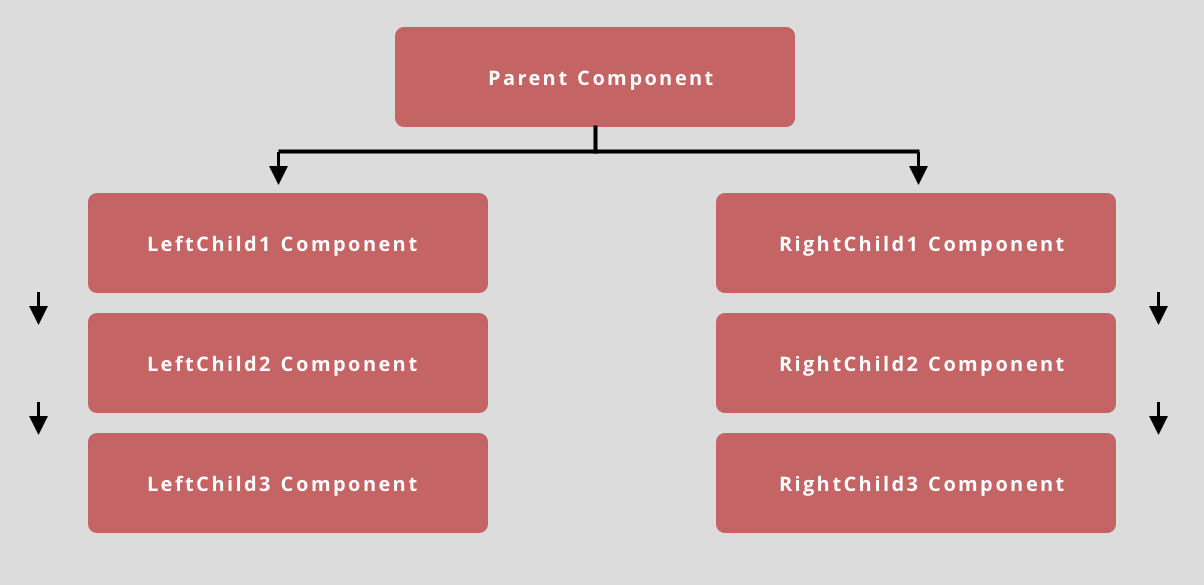
Let's assume we have a Parent component that needs to share state with LeftChild3 and RightChild3 components. Without any state management library, we will need to pass props down every level till it reaches its final destination. It can get cumbersome as our application continues to grow. State management libraries help us solve this problem where the same data is being sent at almost every level due to requirements in the final level component. Many state management libraries can help us - Redux, Recoil, React Context etc. Redux is one of the more popular ones and we'll be working with it in this article.
Redux
Redux by itself is a realtively small API.
React-Redux
To connect Redux with React we need to install react-redux library. There is the old way Connect and the new way using special hooks that can make react and redux communicate with each other. The documentation suggests using React-Redux hooks API as it is simpler and works better with TypeScript.
- React Redux hooks
- Connect
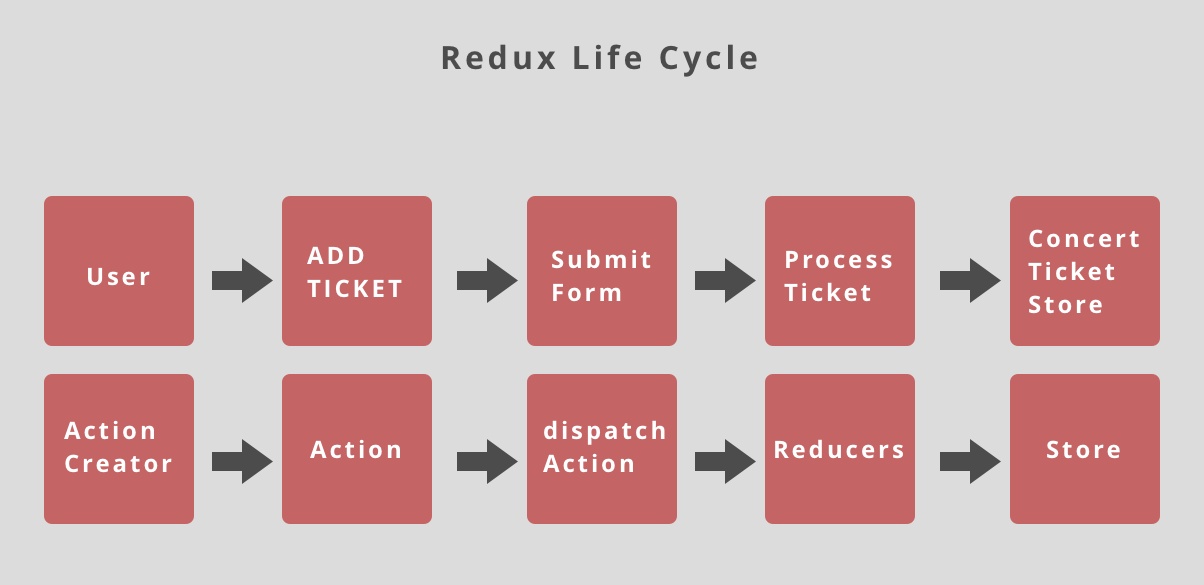
Redux life cycle
Before we dive into each part of Redux & react-redux, it would be nice to get a high-level understanding of how they work together. Let's take a real-world example where a user visits an event booking website to book tickets. They fill a form with their details and then submit it for checkout. If we were to translate this user interaction into a redux life cycle, it would look like the following.
Putting React & Redux together using Hooks
Now, using this redux life cycle lets see how react and redux would work together in a real world application. You can also take a look at this github repo for the final result.
- In redux if we ever want to update the state we need to create an action. Action creator is simply a function which returns that action.
// ./actions/ticketAction.js

export const addTicket = (ticket) => {
  return {
    type: 'ADD_TICKET',
    payload: ticket,
  };
};- An action is just an object that by convention has a property type which is the name of the action (string) and a property payload which is the data. In this example, the user wants to ADD_TICKET (action type) and the payload will be the data they submit with the form. Again by convention, an action type is always all caps and usually saved in a separate file with all other constants.
// ./actions/ticketAction.js

import {ADD_TICKET} from './constants/ActionTypes;

export const addTicket = (ticket) => {
  return {
    type: ADD_TICKET,
    payload: ticket,
  };
};- Next, we need to send (dispatch) this action to the next step in the life cycle. We are going to use the useDispatch hook from react-redux. First, import the useDispatch hook from react-redux, then import the action creator we would like to dispatch, addTicket in this case. Finally on form submit we dispatch the action with the payload (form data).
// BookTicketForm.jsx

import React from 'react';
import { useForm } from 'react-hook-form';
import { useDispatch } from 'react-redux'; <---------------
import { addTicket } from '../redux/actions/ticketAction';

export const BookTicketForm = () => {
  const { register, handleSubmit } = useForm();
  const dispatch = useDispatch(); <---------------

  const onSubmit = (data) => dispatch(addTicket(data)); <---------------

  return (
    <form onSubmit={handleSubmit(onSubmit)}>
      <input {...register('name')} />
      <input {...register('contact#')} />
      <select {...register('ticket')}>
        <option value="regular">regular</option>
        <option value="vip">vip</option>
      </select>
      <input type="submit" />
    </form>
  );
};- Once the user submits the form or after an action is dispatched, the next step in the life cycle is the reducer. Reducer is the place all actions come and update the state in our application. A reducer is simply a function that takes state and action as parameters. Inside this function, we use a switch case to switch between the different action types, when it matches we return a brand new state with the new data and in case there is no match we return the original state. An important point to note is we never mutate the original state.
// reducers/ticketReducer.js

import { ADD_TICKET } from '../constants/ActionTypes';

const initialState = {
  tickets: [],
};

export const ticketReducer = (state = initialState, action) => {
  switch (action.type) {
    case ADD_TICKET:
      return {
        ...state,
        tickets: [...state.tickets, { ...action.payload }],
      };
    default:
      return state;
  }
};
Redux follows the pattern of a single store in our application; however, it also has the concept of multiple reducers where each reducer handles single functionality per reducer. Here we have a ticket reducer for tickets but we could also have a user reducer for managing new and existing users. We could also add new features in the future which could require its own reducer. Hence we need to combine these reducer functions into a single reducing function to adhere to redux principles.
The combineReducers helper function turns an object whose values are different reducing functions into a single reducing function you can pass to createStore.
// reducers/index.js

import { combineReducers } from 'redux';
import { ticketReducer } from './ticketReducer';
import { userReducer } from './userReducer';

const reducers = combineReducers({
  tickets: ticketReducer,
  users: userReducer,
});

export default reducers;- Now the last step is to create our store with all our reducers.
A store holds the whole state tree of your application. The only way to change the state inside it is to dispatch an action on it. A store is not a class. It's just an object with a few methods on it. To create it, pass your root reducing function to createStore.
// store.js
import { createStore } from 'redux';
import reducers from './reducers/index.js';

export const store = createStore(reducers, {});
Finally we can hook up our store with our React application. In the root folder inside index.js file -
// index.js

import React, { StrictMode } from 'react';
import ReactDOM from 'react-dom';
import { App } from './App';
import { Provider } from 'react-redux'; <----------
import { store } from './redux/store'; <----------

ReactDOM.render(
  <StrictMode>
    <Provider store={store}> <----------
      <App />
    </Provider>
  </StrictMode>,
  document.getElementById('root')
);
Ok so our React app is set up with Redux and we are able to add data inside our store. This brings us back to the prop drilling problem we started the article with. How can we access this store data in any component inside our application?.
Lets say we have a cart component that lists all the tickets a user has added. We can use the useSelector hook to access the state object from our store. In the following example we are simply destructuring and accessing the tickets key from the state.
// CartListing.js

import React from 'react';
import { useSelector } from 'react-redux'; <----------
import { CartItem } from '../CartItem';

export const CartListing = () => {
  const { tickets } = useSelector((state) => state.tickets); <----------

  return (
    <>
      {tickets?.map((ticket) => (
        <CartItem ticket={ticket} />
      ))}
    </>
  );
};
Connect
The connect() function is the old way of connecting a React component to a Redux store. Connect accepts four different parameters, all optional. By convention, they are called:
- mapStateToProps?: Function
- mapDispatchToProps?: Function | Object
- mergeProps?: Function
- options?: Object
mapStateToProps()
Going back to our CartListing example where we made use of useSelector hook to access our state from the store, we can achieve the same with mapStateToProps(). As the name of the function suggests, it will take the state and make it available inside the component as a prop. We will also make use of connect() to connect React component to Redux store.
// Cart.js

import React from 'react';
import { connect } from "react-redux"; <----------
import { CartItem } from '../../components/CartItem';

const CartListing = ({tickets}) => {
  return (
    <>
      {tickets?.map(ticket) => (
        <CartItem ticket={ticket} />
      )}
    </>
  );
};

const mapStateToProps = (state) => ({ <---------------
  tickets: state.tickets.tickets
});

export default connect(mapStateToProps)(CartListing); <---------------
mapDispatchToProps()
Going back to the example where the user submitted the form to disaptch an action using the useDispatch hook, we can make use of mapDispatchToProps() to get action creators as props inside the component.
// BookTicketForm.jsx

import React from 'react';
import { useForm } from 'react-hook-form';
import { connect } from 'react-redux'; <---------------
import { addTicket } from '../redux/actions';

export const BookTicketForm = ({addTicket}) => {
  const { register, handleSubmit } = useForm();

  const onSubmit = (data) => addTicket(data); <---------------

  return (
    <form onSubmit={handleSubmit(onSubmit)}>
      <input {...register('name')} />
      <input {...register('contact#')} />
      <select {...register('ticket')}>
        <option value="regular">regular</option>
        <option value="vip">vip</option>
      </select>
      <input type="submit" />
    </form>
  );
};

const mapDispatchToProps = (dispatch) => ({ <---------------
  addTicket: (payload) => dispatch(addTicket(payload)),
});

export default connect(null, mapDispatchToProps)(BookTicketForm); <---------------
Middlewares (redux-thunk)
Middleware is just code that sits between the action being dispatched and reaching the reducer. It is most commonly used for asynchronous actions, logging etc. We are going to use a library called redux-thunk to help us here. To set up redux-thunk library we first need to install the library and then connect it to our store.
> npm install redux-thunk// store.js
import { createStore, applyMiddleware } from 'redux';
import reducers from './reducers/index.js';
import thunk from 'redux-thunk'; <---------------
export const store = createStore(reducers, {}, applyMiddleware(thunk)); <---------------Now let us say we have an action creator which makes an external API call to get data that it returns in the action payload. It is achievable with the help of redux-thunk.
const getProducts = () => {
  return async function (dispatch) => {
    const items = await fetch('/api_endpoint')
    if(items) {
      dispatch({
        type: GET_PRODUCTS,
        payload: items.json()
      })
    }
  }
}
Conclusion
We have covered the basics we need to get started building react-redux applications. However this way of working with Redux can get overwhelming because of all the different parts there are to it. This is where Redux toolkit comes to our rescue as it really simplifies it and we no longer need an action creator, action. We will learn to work with Redux toolkit in the next article.